The Best Crème Brûlée Recipe (Only 4 Ingredients)
Don’t let its fancy French name fool you – this classic Crème Brûlée is surprisingly simple to make. With just four ingredients and some basic techniques, you can create a restaurant-quality dessert that never fails to impress. The contrast between the silky smooth custard and crackling caramelized sugar top makes this dessert pure magic.
Why You’ll Love This Recipe
This Crème Brûlée recipe proves that sometimes the simplest things are the most extraordinary. Using just heavy cream, egg yolks, vanilla, and sugar, you’ll create a dessert that rivals any high-end restaurant version. The custard is perfectly creamy with a delicate vanilla flavor, while the caramelized sugar top provides that signature crack when tapped with a spoon.
The best part? You can make the custards ahead of time and torch the tops just before serving, making this perfect for entertaining.
Ingredients & Equipment
The 4 Essential Ingredients:
- 2 cups heavy cream
- 5 large egg yolks
- 1/2 cup granulated sugar (plus more for topping)
- 1 vanilla bean (or 1 tablespoon pure vanilla extract)
Equipment Needed:
- 4 (6-ounce) ramekins
- Large baking dish (for water bath)
- Kitchen torch
- Fine-mesh strainer
- Whisk
- Kettle for boiling water
- Instant-read thermometer (optional but helpful)
Step-by-Step Instructions
- Prep Your Oven (5 minutes)
- Preheat to 325°F (165°C)
- Position rack in center of oven
- Place ramekins in large baking dish
- Prepare the Cream (10 minutes)
- Heat cream in saucepan until almost simmering
- If using vanilla bean: split and scrape seeds into cream
- Remove from heat and let steep 10 minutes if using vanilla bean
- Mix the Custard Base (5 minutes)
- Whisk egg yolks and 1/2 cup sugar until pale
- Gradually whisk in warm cream
- Strain mixture through fine-mesh strainer
- Fill and Bake (35 minutes)
- Pour custard into ramekins
- Pour hot water into baking dish halfway up sides of ramekins
- Bake until set but still slightly jiggly (30-35 minutes)
- Centers should register 170°F on instant-read thermometer
- Chill (4 hours minimum)
- Remove from water bath
- Cool at room temperature 30 minutes
- Cover with plastic wrap
- Refrigerate at least 4 hours or up to 3 days
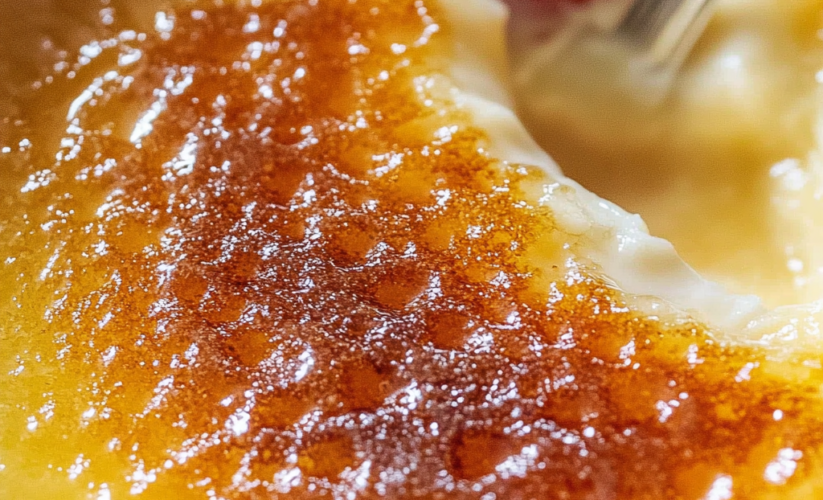
- The Final Touch (5 minutes)
- Sprinkle 1-2 teaspoons sugar evenly on each custard
- Use torch to caramelize until deep amber
- Let sugar harden 2-3 minutes before serving
Pro Tips for Perfect Crème Brûlée
- Use room temperature eggs for smoother custard
- Strain the custard to remove any egg bits
- Don’t skip the water bath – it ensures even cooking
- Look for the “jiggle test” – centers should wobble slightly when done
- Let sugar layer dry completely before torching
- Clean torch nozzle between servings for even caramelization
Troubleshooting Guide
Problem: Custard is curdled
- Heat cream gradually
- Temper eggs carefully
- Use water bath
- Don’t overbake
Problem: Sugar won’t caramelize properly
- Ensure surface is dry
- Use thin, even layer of sugar
- Hold torch at proper distance
- Use regular granulated sugar
Storage & Make-Ahead Tips
Make-Ahead Options:
- Custards can be made up to 3 days ahead
- Store covered in refrigerator
- Don’t caramelize sugar until serving time
Storage Notes:
- Keep refrigerated
- Best eaten within 4 hours of torching
- Don’t re-torch once caramelized
No Torch? No Problem!
If you don’t have a kitchen torch, you can use your broiler:
- Place ramekins on baking sheet
- Add sugar layer
- Broil 2-3 minutes, watching carefully
- Rotate for even browning
FAQs
Can I use half-and-half instead of heavy cream?
No, heavy cream is essential for proper texture.
Why did my custard curdle?
Usually due to overcooking or not using a water bath.
Can I double this recipe?
Yes, but you may need to adjust baking time slightly.
How do I know when they’re done?
Edges should be set but center should still jiggle slightly.
Can I use vanilla extract instead of a vanilla bean?
Yes, though vanilla bean provides superior flavor.
This classic Crème Brûlée proves that sometimes the most impressive desserts are also the simplest. With just four ingredients and some patience, you can create a dessert that’s guaranteed to wow your guests. Remember, the key to success lies in the technique – gentle heating, proper tempering, and patience during the chilling process. Master these basics, and you’ll have a foolproof dessert that rivals any restaurant version.