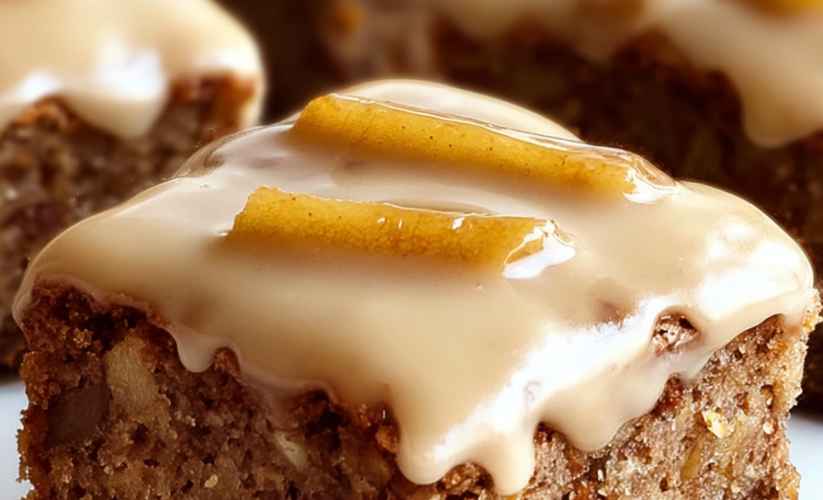
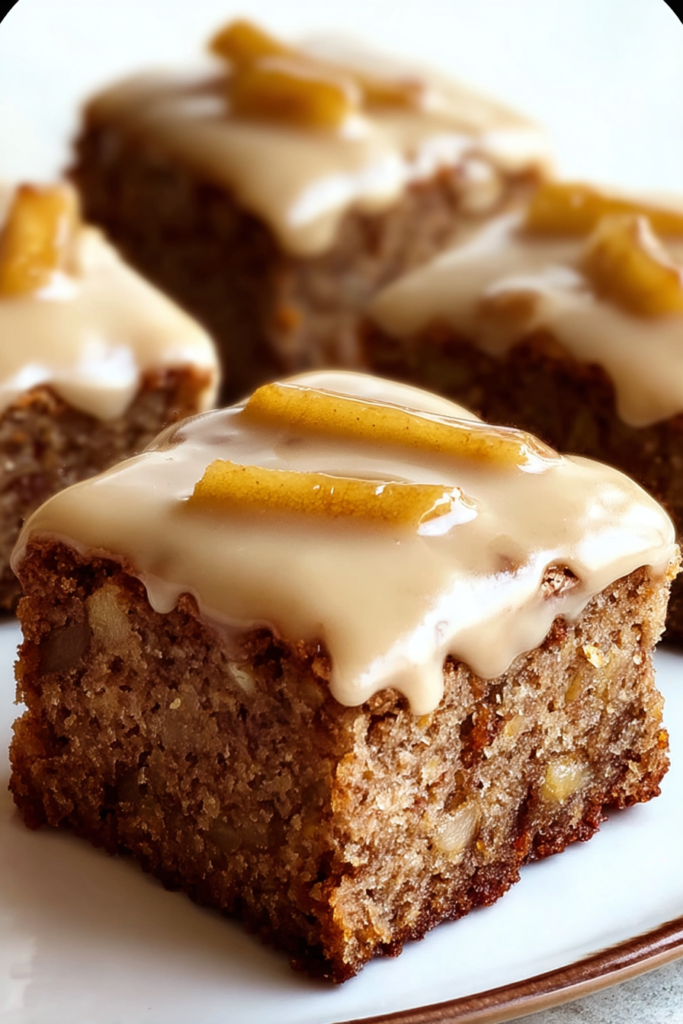
Apple Brownies with Maple Glaze

These irresistibly soft, cake-like bars combine the warm spices of cinnamon and nutmeg with chunks of fresh apple, all bound together in a brown sugar-sweetened batter that bakes into tender, moist perfection. The recipe cleverly uses “brownies” in the name despite containing no chocolate, referring instead to the bars’ dense, chewy texture and the rich caramel notes from brown sugar and butter. Finished with a glossy maple glaze that adds sweet, woodsy flavor and beautiful presentation, these apple brownies bridge the gap between casual snack and elegant dessert, making them equally appropriate for lunchbox treats, afternoon coffee companions, or plated desserts garnished with whipped cream and extra cinnamon.
Why You’ll Love This Recipe
- Captures Fall in Every Bite – The combination of fresh apples, warm spices, brown sugar, and maple syrup creates the quintessential autumn flavor profile that evokes crisp weather, apple orchards, and cozy sweaters.
- Foolproof One-Bowl Simplicity – This straightforward recipe requires just one bowl and basic mixing—no creaming butter, no electric mixer necessary, and no complicated techniques that could go wrong.
- Fresh Fruit Integration – Unlike many bar cookies, these incorporate substantial fresh apple pieces that add moisture, natural sweetness, and textural interest while contributing vitamins and fiber.
- Maple Glaze Elegance – The simple four-ingredient glaze transforms humble bars into something special, adding glossy visual appeal and extra layer of sweet, complex flavor.
- Flexible Sizing Options – The recipe works in either 8×8 or 9×9-inch pans, yielding 12-16 bars depending on desired size, making it adaptable to your serving needs and pan availability.
- Room Temperature Stable – These bars don’t require refrigeration and actually improve in texture after sitting for several hours as flavors meld and moisture distributes evenly throughout.
Ingredients You’ll Need
For the Apple Brownie Base
- 1 cup butter, melted – Provides rich flavor and creates tender, moist texture; use unsalted butter to control sodium levels, melting it just before use and allowing it to cool slightly.
- 2 cups brown sugar – Delivers deep caramel flavor and molasses notes that complement apples beautifully; light or dark brown sugar both work, with dark offering more intense flavor.
- 2 large eggs – Bind ingredients together while adding structure through protein and richness through fat; room temperature eggs incorporate more smoothly into the batter.
- 2 tsp vanilla extract – Enhances all other flavors while adding aromatic warmth; pure vanilla extract provides superior flavor compared to imitation varieties.
- 2 cups all-purpose flour – Provides the structural foundation for the bars; all-purpose flour’s moderate protein content (10-12%) creates ideal texture that’s sturdy yet tender.
- 1 tsp cinnamon – Delivers the signature warm, sweet, aromatic spice flavor essential to apple desserts; use Ceylon cinnamon for delicate flavor or Cassia for more intense profile.
- 1/2 tsp nutmeg – Adds warm, slightly sweet, aromatic complexity that complements cinnamon without overwhelming; freshly grated nutmeg provides superior flavor to pre-ground.
- 1/2 tsp salt – Enhances and balances all flavors, preventing the bars from tasting flat or one-dimensionally sweet; fine sea salt or table salt works best.
- 2 cups peeled diced apples – Contributes fresh fruit flavor, natural sweetness, moisture, and tender chunks throughout the bars; approximately 2 medium apples, diced into 1/4-1/2 inch pieces.
For the Maple Glaze
- 1 cup powdered sugar – Forms the sweet, smooth glaze base; confectioners’ sugar dissolves easily without graininess that granulated sugar would create.
- 2-3 tbsp maple syrup – Provides the signature flavor and liquid for the glaze; use pure maple syrup (Grade A or Grade B) rather than pancake syrup for authentic flavor.
- 1 tbsp melted butter – Adds richness and helps create glossy, pourable consistency while contributing to flavor depth.
- 1/2 tsp vanilla extract – Enhances the maple flavor and adds aromatic complexity that prevents the glaze from tasting one-dimensionally sweet.
Step-by-Step Instructions
Prepare the Baking Pan
Preheat your oven to 350°F (175°C), positioning the rack in the center for even heat distribution. Grease an 8×8-inch or 9×9-inch baking pan generously with butter or non-stick cooking spray, or line it with parchment paper leaving overhang on two sides for easy removal after baking. The parchment method creates the cleanest bars with no stuck edges.
Create the Butter-Sugar Base
In a large mixing bowl, combine the melted butter (cooled slightly so it’s not extremely hot) and brown sugar, stirring vigorously with a wooden spoon or whisk for 1-2 minutes until the mixture is smooth, well combined, and slightly lighter in color. Add the eggs one at a time, stirring well after each addition until fully incorporated, then mix in the vanilla extract until evenly distributed throughout the mixture.
Incorporate the Dry Ingredients
Add the all-purpose flour, cinnamon, nutmeg, and salt directly to the wet ingredients. Using a wooden spoon or rubber spatula, stir the mixture together with folding motions just until no visible streaks of flour remain and all ingredients are combined. Avoid overmixing, which would develop gluten and create tough, dense bars rather than tender ones—the batter should appear somewhat thick and sticky.
Fold in the Fresh Apples
Add the peeled and diced apples to the batter and fold them in gently with a spatula, distributing them evenly throughout the mixture. The apples should be coated with batter but remain in distinct pieces rather than breaking down. The batter will be quite thick and studded with visible apple chunks.
Bake Until Set
Spread the thick batter into the prepared baking pan, using a spatula to push it into corners and smooth the top surface as evenly as possible—it doesn’t need to be perfectly smooth. Place the pan in the preheated 350°F oven and bake for 35-40 minutes, until the bars are set in the center (no longer jiggly when gently shaken), golden brown on top, and a toothpick inserted into the center comes out clean or with just a few moist crumbs clinging to it. The exact timing depends on your pan size—8×8 pans create thicker bars requiring the full 40 minutes, while 9×9 pans create slightly thinner bars that may be done at 35 minutes.
Cool Slightly Before Glazing
Remove the pan from the oven and place it on a wire cooling rack. Allow the bars to cool for 10-15 minutes—they should still be warm but not scorching hot, as applying glaze to extremely hot bars causes it to become too thin and soak in completely rather than forming a distinct layer on top.
Prepare the Maple Glaze
While the bars cool, whisk together the powdered sugar, 2 tablespoons of maple syrup, melted butter, and vanilla extract in a small bowl until completely smooth with no lumps remaining. The glaze should be thick but pourable—similar to the consistency of honey or thick cream. If it’s too thick to drizzle, add the remaining tablespoon of maple syrup gradually, whisking after each addition, until you achieve pourable consistency. If it becomes too thin, add more powdered sugar one tablespoon at a time.
Glaze and Set
Drizzle the prepared maple glaze over the warm bars in the pan, using a spoon to create decorative patterns or simply pouring it back and forth across the surface for even coverage. You can spread the glaze with an offset spatula for complete coverage or leave it in artistic drizzle patterns. Allow the glazed bars to sit at room temperature for at least 30 minutes to let the glaze set and firm up before slicing. For cleanest cuts, wait until the bars are completely cool.
Slice and Serve
Once cooled and the glaze has set, use the parchment paper overhang to lift the entire block of bars from the pan, or cut directly in the pan. Using a sharp knife wiped clean between cuts, slice into 12-16 squares depending on desired size. Serve at room temperature for best texture and flavor.
Recipe Notes & Tips
- Apple Variety Selection – Any apple variety works well; Granny Smith provides tart contrast, Honeycrisp offers sweetness and crunch, Fuji contributes extra sweetness, or use a combination for complexity—avoid Red Delicious which become mealy when baked.
- Proper Dicing Size – Cut apples into 1/4 to 1/2-inch dice for optimal distribution and texture; larger pieces create gaps and may remain too firm, while smaller pieces break down and disappear into the batter.
- Butter Temperature – Allow melted butter to cool for 2-3 minutes before adding to sugar; extremely hot butter can cook the eggs prematurely when added, creating scrambled egg bits rather than smooth batter.
- Don’t Overmix – Stir just until flour disappears; overmixing develops gluten strands that create tough, dense texture rather than the tender, cake-like consistency these bars should have.
- Doneness Testing – Check at 35 minutes; the center should appear set and not jiggly, and a toothpick should emerge with moist crumbs (not wet batter) but shouldn’t be completely clean and dry.
- Glaze Consistency – The glaze thickens as it sits; if it becomes too thick to drizzle, add maple syrup or milk one teaspoon at a time, whisking between additions, until reaching desired consistency.
Nutritional Information
- Prep Time: 15 minutes (peeling and dicing apples, measuring ingredients)
- Baking Time: 35-40 minutes (depending on pan size)
- Cooling Time: 10-15 minutes before glazing, 30+ minutes for glaze to set
- Total Time: Approximately 1 hour 30 minutes (including all cooling)
- Servings: 12-16 bars (depending on cutting size)
- Calories: Approximately 280-320 per bar based on 16 servings (estimated with standard ingredients including glaze)
Perfect Pairings
- Hot Coffee or Tea – Serve with strong black coffee, chai tea, or Earl Grey whose slight bitterness balances the sweet bars and complements the warm spices.
- Vanilla Ice Cream – Top warm bars with a scoop of vanilla ice cream for an indulgent dessert that creates hot-and-cold contrast.
- Whipped Cream – Accompany with freshly whipped cream or whipped topping for added richness and lighter textural contrast to the dense bars.
- Apple Cider – Pair with hot or cold apple cider for an all-apple experience that reinforces the autumn flavor profile.
Ideal Occasions
- Fall Gatherings – Serve at autumn potlucks, Thanksgiving celebrations, or Halloween parties when apple and maple flavors feel seasonally appropriate and comforting.
- Afternoon Coffee Companion – Enjoy as a mid-afternoon snack with coffee or tea when you need something sweet and satisfying between meals.
- Bake Sales and School Events – Prepare for fundraising bake sales, school functions, or community events where the bars travel well and appeal to diverse age groups.
- Weekend Baking Projects – Make on lazy weekend mornings when you have time to enjoy the baking process and the house-filling aroma of apples and cinnamon.
Storage & Serving Tips
- Room Temperature Storage – Store in an airtight container at room temperature for up to 4 days; the bars actually improve in texture after 24 hours as moisture distributes evenly.
- Refrigerator Storage – For longer storage, refrigerate in an airtight container for up to 1 week; bring to room temperature before serving for best texture and flavor.
- Freezer Storage – Wrap individual bars tightly in plastic wrap and freeze in freezer bags for up to 3 months; thaw overnight at room temperature or microwave briefly.
- Serving Temperature – While delicious warm, these bars slice more cleanly and have better texture at room temperature after the structure has fully set.
Creative Variations to Try
- Cranberry Addition – Fold in 1/2 cup dried cranberries along with the apples for tart-sweet contrast and additional texture and color.
- Walnut or Pecan Enhancement – Add 1 cup chopped toasted walnuts or pecans for nutty flavor and crunchy texture that complements the soft apple pieces.
- Caramel Drizzle – Replace maple glaze with caramel sauce or add caramel drizzle on top of the maple glaze for extra indulgence and deeper sweetness.
- Spice Variation – Add 1/4 teaspoon ground ginger or cardamom along with the cinnamon and nutmeg for additional warmth and complexity.
Troubleshooting Common Issues
- Dry, Crumbly Texture – Overbaking or insufficient butter causes dryness; check doneness at 35 minutes and ensure accurate butter measurement (1 full cup is 16 tablespoons or 2 sticks).
- Gummy, Undercooked Center – Insufficient baking time or too-thick batter layer creates gumminess; ensure apples are diced small and bake until the center is fully set when gently shaken.
- Glaze Too Thin or Thick – Incorrect maple syrup ratio affects consistency; add liquid gradually if too thick, or powdered sugar if too thin, whisking between additions until achieving honey-like consistency.
- Bland Apple Flavor – Under-seasoning or using bland apple varieties creates flat taste; use flavorful apple varieties and ensure full teaspoon measurements of cinnamon and nutmeg.
Why This Recipe Works
Apple Brownies with Maple Glaze succeed through the harmonious combination of complementary flavors and textures that create cohesive, satisfying bars. The melted butter method (rather than creaming) creates tender, dense texture similar to blondies while streamlining preparation. Brown sugar contributes deep caramel and molasses notes that enhance the apple flavor while providing moisture that keeps the bars soft for days. The warm spices—cinnamon and nutmeg—contain volatile aromatic compounds that complement apples’ natural flavor profile, creating the classic pairing recognized across cultures and cuisines. Fresh apple pieces contribute moisture, natural pectin that helps bind the bars, and textural interest through their tender chunks that contrast with the cake-like surrounding crumb. The relatively low oven temperature (350°F) ensures gentle, even baking that cooks the center thoroughly without over-browning the edges. The maple glaze adds a final layer of sweetness and visual appeal while its butter content contributes additional richness; maple’s complex flavor—containing over 300 compounds including vanillin and various phenols—creates sophisticated taste that elevates these beyond simple apple bars. At approximately 280-320 calories per bar, this represents moderate indulgence where calories derive primarily from butter, brown sugar, and maple syrup—designed as an occasional treat or special dessert rather than everyday snack, though the fresh fruit content and relatively modest portion size make these less guilt-inducing than many bar cookies.
Final Thoughts
Apple Brownies with Maple Glaze represent the successful marriage of fruit-forward baking with comforting bar cookie convenience, creating something that feels both wholesome and indulgent. This recipe appeals particularly to those seeking autumn-inspired desserts, bakers wanting foolproof recipes with minimal technique required, or anyone craving the nostalgic combination of apples and warm spices that evokes childhood memories and seasonal traditions. The “brownie” designation cleverly references the bars’ dense, chewy texture while the fresh apples and maple glaze distinguish these from chocolate brownies entirely, creating something unique in the bar cookie category. The one-bowl preparation removes barriers of complicated technique or extensive cleanup, making these accessible to novice bakers while the sophisticated flavor profile and elegant maple glaze satisfy more experienced palates. The room-temperature stability and make-ahead capability make these particularly valuable for entertaining, gifting, or meal planning when you need desserts that won’t require last-minute preparation or refrigeration logistics. While the 280-320 calorie estimate per bar represents sweet indulgence, the inclusion of fresh fruit, the relatively modest serving size, and the occasional-treat nature of desserts appropriately frame these as celebration food rather than everyday fare. For those seeking lighter versions, consider reducing butter to 3/4 cup, using half white whole wheat flour, or decreasing the sugar slightly; though these modifications will alter the tender, moist texture that defines these bars’ appeal. Ultimately, this recipe deserves a permanent place in fall baking collections as proof that impressive, delicious desserts needn’t require complicated techniques or exotic ingredients—sometimes the best baking celebrates seasonal produce, honors classic flavor combinations, and delivers reliable results that bring smiles to everyone around the table.